
Everything you need to know about alarms in one handy guide (including a key new feature set to arrive soon).
Setting an alarm is one of the Apple Watch’s most useful tricks. Having your morning wake-up occur from the wrist can be more peaceful than the blaring sound of your iPhone, and they’re also super simple to get started with.
Yet, there are many common issues with Apple Watch alarms we get asked about all the time.
Sometimes you’ll need to troubleshoot why the Apple smartwatch isn’t sounding, configure some settings to avoid snoozing through it, or separate it from your iPhone alarm.
Whatever the case, this guide serves as the ultimate hub for all Apple Watch alarm-related FAQs. We’ve been waking up with the smartwatch for the best part of the last decade, and the below is all updated to work with the latest software (watchOS 11).
Incoming in watchOS 26: Custom snooze time
This wasn’t explicitly mentioned in Apple’s WWDC 2025 keynote, but the folks over at MacRumors suggest that the iOS 26 beta includes an option to customize snooze times—finally.
Although the Apple smartwatch isn’t mentioned, the aligned nature of iOS/watchOS alarms will likely result in this change being carried over as well.
Currently, the functionality allows users to change the snooze period between 1 and 15 minutes, ending the long-standing fixed nine-minute break.
Stay tuned for more on this one, and catch up on everything else coming in watchOS 26 in the meantime.
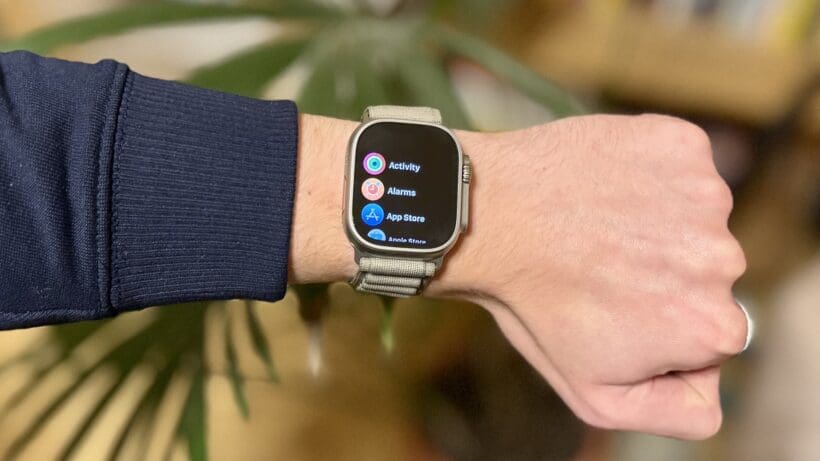
1. How to set or delete an alarm on the Apple Watch

Let’s start with the absolute basics, setting and deleting alarms from the watch.
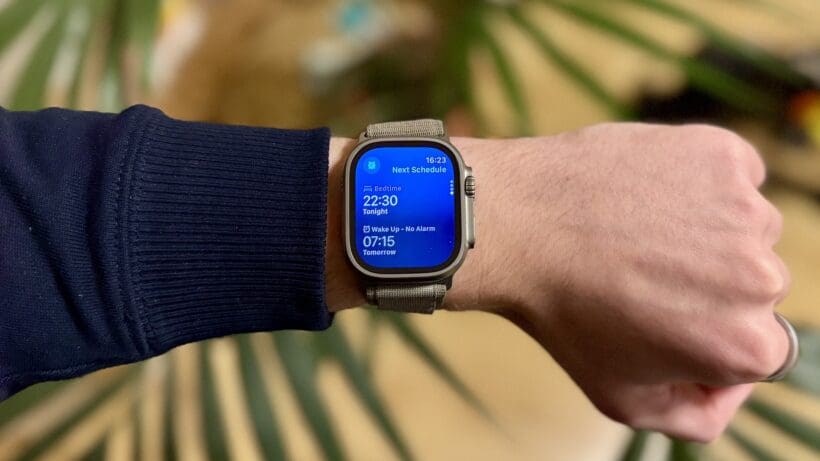
To add a regular Wake Up alarm to the Apple Watch:
- Go to the Sleep app on the Apple Watch.
- Swipe through the data until you’ve landed on the ‘Next Schedule’ screen.
- Tap on the ‘Wake Up’ section.
- Select a bedtime and wake-up time (either for your next sleep or full-time schedule).
- Choose your sound and switch the alarm setting to green.
- You can also add a Sleep Goal and Wind Down period, which helps the Apple Watch (and iPhone) mute notifications and set approximate bedtimes automatically.
To add a one-off alarm on the Apple Watch:
- Open the Alarms app on the Apple Watch.
- Scroll down to the bottom and tap the ‘+’ icon.
- Turn the Digital Crown to alter the hour and minute, and tap to toggle AM/PM.
- Tap the green tick icon in the bottom-right corner to confirm.
Delete an alarm on the Apple Watch:
- Open the Alarms app on the Apple Watch.
- Swipe from right to left until the red bin icon appears and tap it.
2. Apple’s ‘Sleep | Wake Up’ alarms vs. ‘Other’ alarms
As described above, there are two types of alarms on the Apple Watch: wake-up alarms set through the Sleep app (and viewable in the Alarms app under ‘Sleep | Wake Up) and a standard type of alarm found under ‘Other’.
So, what’s the difference between them? Functionally, not much. The key difference is that Sleep | Wake Up schedule alarms sync with your iPhone and the Sleep app, while one-off/’Other’ alarms set on the Apple Watch don’t necessarily roll back to the iPhone (though if set on the iPhone they can be set to sync over).
The Sleep | Wake Up alarm will sync with your iPhone (meaning you can change the settings from either), but will only sound on the Apple Watch when wearing it.
I’ve struggled with this, as I like to get out of bed to turn my iPhone alarm off, so consult the tips below on separating your Apple Watch alarm from the iPhone if that’s also you. And don’t worry about the Apple Watch not tracking sleep if you disable the alarm for this mode – it still will.
One-off and more customizable alarms can also be set solely in the Alarms app, and are handy for wake-ups or reminders throughout the day. For example, I have a daily alarm to remind me to finish eating/drinking and reduce blue light, and another on my iPhone as my daily wake-up.
3. Syncing Apple Watch alarms with the iPhone (or not)
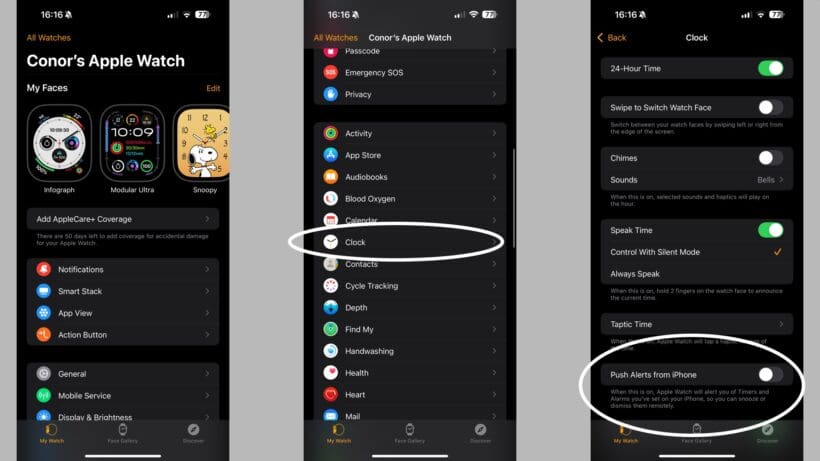
Wanting to separate the Apple Watch alarm from the iPhone – i.e. turn it off – is an issue we discovered when recently re-testing the Apple Watch SE 2.
We have a detailed guide here on the imperfect solution to separating your iPhone alarm from the Apple Watch, but you may also wish to sync the two up again.
This comes down to tinkering with the mirroring setting on the iPhone’s Watch app. Follow the steps below to do so.
- Open the Watch app on your iPhone.
- From ‘My Watch’, scroll down to ‘Clock’ and select it.
- Find the ‘Push Alerts from iPhone’ and check/uncheck the switch.
- Next, go to the Clock app on your iPhone and turn off your ‘Sleep | Wake Up’ schedule.
- Instead, have your morning alarm sound under the ‘Other’ section.
4. Vibrating Apple Watch alarms (and how to enable stronger haptic feedback)
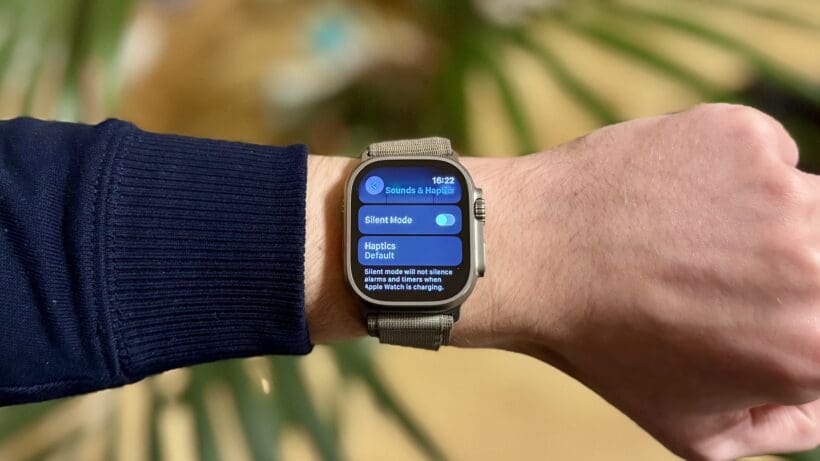
The Apple Watch’s haptics status dictates whether your alarm vibrates.
Double-check your settings by following the steps below, and adjust the setting to ‘Off’ if you want to disable vibrations (i.e. sound-only alarms).
- On the Apple Watch, go to the Settings app.
- Find the ‘Sounds & Haptics’ section’.
- Ensure haptics is set to ‘Default’ (or ‘Prominent’ if you want stronger vibrations)
Related tip: Want a vibrate-only Apple Watch alarm?
Ensure the Apple Watch’s Silent Mode is enabled via the Control Center. Press the side button and tap the bell icon to adjust this.
5. Disable the option to snooze an Apple Watch alarm
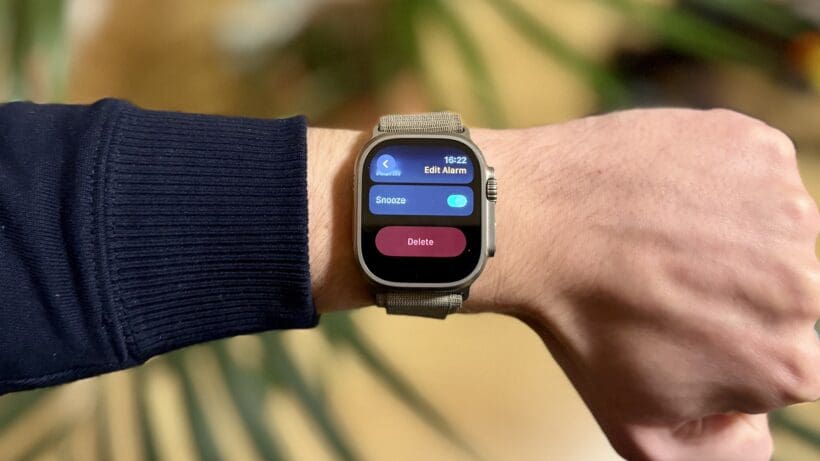
This is an easy one to miss, but an essential trick if you’re prone to giving yourself an extra few minutes in bed with your alarm sounding.
Instead of the ‘Stop’ and ‘Snooze’ options appearing when your alarm triggers, only the former will if you follow the steps below. This isn’t one we use, as it’s too easy to accidentally cover the screen, silence the alarm, and then sleep through, but the option is there nonetheless.
- Go to the Apple Watch alarms app.
- Edit an existing alarm or create a new alarm.
- In the edit section of your chosen alarm, flick the ‘Snooze’ switch to green.
6. Set an alarm with Siri
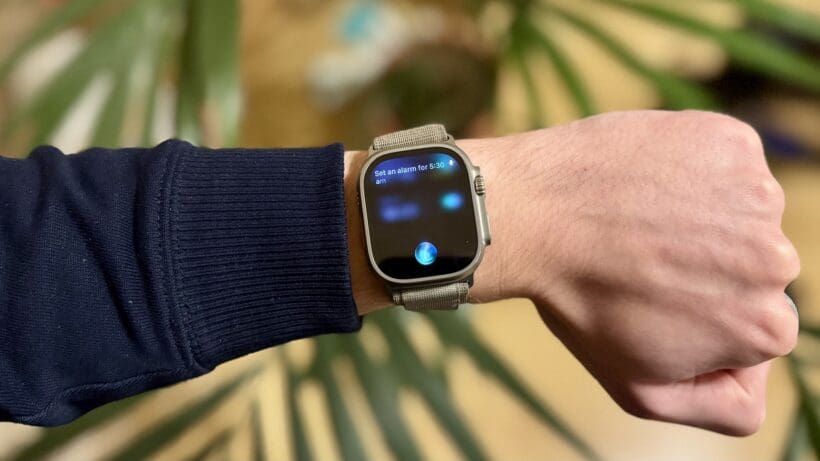
This is a great way to set one-off alarms for naps, unusually early wake-up times, or as a prompt during the daytime. It’s also super quick and easy.
To set a Siri Apple Watch alarm, hold down the Digital Crown for a second to trigger the smart assistant and say something like: “Set an alarm for [insert time and day]”.
Siri will then confirm this by reading the alarm back to you and dismissing itself.
7. Enable or disable Bedside Mode
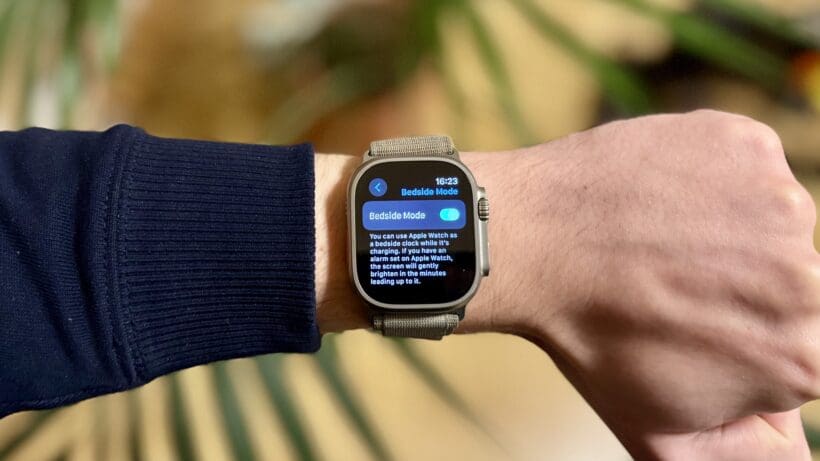
If you don’t want to use your Apple Watch to track sleep, and all the extra charging faff that goes with it, you can use your Apple Watch as a bedside clock.
As shown in the image above, this is when your Apple Watch displays the date and time, the charge percentage, and also an icon indicating any potential alarm you have set.
Follow these steps to enable or disable Bedside Mode:
- Go to the Apple Watch’s Settings app.
- Under ‘General’, find ‘Bedside Mode’.
- Enable or disable this using the switch.
8. Allow alarms to sound even in Silent Mode

This feature took a long time to be introduced to the Apple Watch. Before watchOS 11.4 (released in April 2025), the smartwatch only used haptic feedback to trigger an alarm in Silent Mode.
Providing your Apple Watch is up to date, a toggle allows alarms to break through Silent Mode and play sound (and still provide haptic feedback). To enable this feature:
- Open the Alarms app on the Apple Watch
- Create a new alarm or tap into a pre-existing one.
- Scroll down and find the ‘Break Through Silent Mode’ option—enable it.


